Hello and welcome~ I will explain in too many details the journey of our magical pallet garden in our backyard created on ~earth day with a giant horse laying on its back in our front yard. budum ba ba~


The far back corner of our yard is like the elephant graveyard of gardening hopes and dreams.This corner has been home to many things from our tree house, garden, compost, stick party and poison ivy forest. Last spring, Dominick and I started to weed and clear it out without an expectations or plans. It is on a slope/slant so really it was just a cool let’s do this adulting thing, much wow yes.
fast forward~
Earth day I was feeling extra earthy and it was go-time. We had these palettes in our backyard since last summer I don’t want to talk about it… it’s an awkwardly long story starting and ending with my love for free things and upcycling them… Anyrate… I had these four pallets just casually wishing they had a purpose and I figured, why couldn’t I make a planter of some sort on this sad mudslide. And a D R E A M was BORN. I have this in various steps for those who like steps, but this is also a trainwreck of a rambling hot mess. 
Initial Phase: Ask someone more experienced at adulting if this idea would work.
~Hello experienced adults, I am considering preparing a lavish garden full of culinary herbs and vegetables for consumption on the back plot of the estate using seasoned lumber.
Gasps of joy were heard from the experienced adults, to which the eldest replied, “Your adulting skills are much impressive!” Okay, no but my panel of experienced adults were all, heck yes.
Step one: Plan it out. This plot of land is on a slope. yes, I said it again. So this slope took some thought and plan. Not my brother Jacob and I decided we should probs dig down deep enough to possibly either try to even out this plot or to semi-bury these pallets. We had no idea what to expect. cue digging~ Protip, if you are doing this on a mostly flat surface I would try to make it even with the ground, that was the original hope and dream~
 Step two: Due to this elephant graveyard being a literal freaking root fest we spent a good four hours AT LEAST removing roots and stumps. This is where I give a huge shoutout to NMB JACOB … FOR HELPING ME WITH MY DREAMS. #squadgoals who I literally owe like 2,000 Jamba Juices and teas to since he did most of the hard labor…. I don’t think I will ever be able to use an ax… Hello has anyone read “Where the Red Fern grows”?!?!?! anyways….. ~also Brother Jacob and Jennii were in the jumpy house we had all weekend with the girls so they wins bonus points too…
Step two and a half: This is where you realize how much your life on Harvest moon paid off. Another shoutout because NMB Jacob helped me figure out wtf I was doing on Harvest Moon #bless
Step three-ish: This is where in our case it gets to be so freaking complicated. This classy photo was obtained from ~Mathisfun.com and such a wonderful example of our literal sweat and labors. Why yes, let’s try to make this more even shall we? Ah yes, pip pip. Though this obtuse angle is not the exact angle, you get an idea of how bogus this uphill nonsense was.
Anywho…. so eventually we had softer soil and said screw it, it is going to be good enough because we are on a hill… working in not ideal conditions.
Step 82: Basically, pushed these bad boys into the ground, made them evenish with rocks under the corners and middle. Added old scrap brick to the openings on the sides and to fill any gaps. This also helped to make it a little more sturdy, because remember… we are on a slope….
14: Fill back with dirt and soil, also soil goals would be to have it even with the wood. 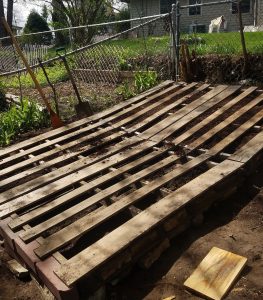
Much wow, magics.
This is an actual thing though, and while ours isn’t 100% yet, I will post an update when it is. There is more soil now vs this pic. The weather has been a little bananas but, soon. Soon.
Supplies:
- Pallets
- Yard/land~ garden
- Gardening tools and shovel/hoe
- Bricks
- Measure
- Dig it out
- Place and secure
- Fill in
- Fin.
this post was written in the wee hours of the narcolepsy sleep attack. I did not proof read this. I find myself rather amusing and no cares were given.